Back Workout Gym: The Ultimate Guide to Building a Strong, V-Shape Back
BACK
Admin
9/25/20247 min read
Discover various preacher curl variations to keep your workouts fresh and effective, along with common mistakes to avoid for optimal results. Whether you're a beginner or a seasoned lifter, this guide will equip you with the knowledge and techniques needed to elevate your arm training..
Designed by freepik
Table of Contents
Frequently Asked Question (FAQ)
Introduction
Welcome to your ultimate guide on back workouts at the gym! The back is one of the most critical muscle groups in our body. A well-developed back not only gives you the iconic "V-shape" look but also improves your posture, supports your overall strength, and enhances your athletic performance. In this blog post, we’ll dive deep into the anatomy of the back muscles, the best exercises for each muscle group, tips for effective workouts, and some essential safety measures. By the end, you'll have everything you need to build a strong, defined back!
Section 1: Understanding Back Anatomy and Its Importance
Why Train the Back?
Enhances posture and reduces back pain.
Improves overall strength and stability.
Adds width and depth, enhancing your V-taper look.
Complements other workouts by stabilizing your core and shoulders.
Key Muscle Groups in the Back
Latissimus Dorsi (Lats): Gives width, contributing to the V-shape.
Trapezius (Traps): Adds mass to your upper back and is crucial for movements like shrugs and deadlifts.
Rhomboids and Rear Deltoids: Smaller muscles that stabilize shoulder blades, important for rowing exercises.
Erector Spinae: Supports your spine, essential for maintaining posture and core stability.
Benefits of Training Each Muscle Group
Detailed explanation of how each muscle impacts movements and functional strength.
Example: Lats help with pull-ups and improve shoulder mobility; traps enhance shoulder health and stability.
Section 2: The Best Back Exercises
Each of these exercises targets different parts of the back. Let’s dive into the essential exercises that should be part of your routine.
1. Pull-Ups / Lat Pulldowns
Target Muscle: Lats, Traps
How to Perform:
Use an overhand grip slightly wider than shoulder-width.
Pull your chin above the bar or bring the pulldown bar to your chest.
Focus on squeezing your shoulder blades together.
Benefits: Builds width and activates a large portion of the upper back.
Variations: Wide-grip, narrow-grip, behind-the-neck (be cautious).
2. Barbell Rows
Target Muscle: Lats, Traps, Rhomboids
How to Perform:
Grab a barbell with an overhand grip.
Bend forward at a 45-degree angle, keeping your back straight.
Pull the barbell towards your waist while squeezing your shoulder blades together.
Benefits: Develops thickness and depth.
Variations: T-bar row, dumbbell row, Pendlay row.
3. Deadlifts
Target Muscle: Erector Spinae, Lats, Traps, Hamstrings, Glutes
How to Perform:
Stand with feet shoulder-width apart.
Bend at the hips and knees to grip the barbell.
Lift by driving through your heels and straightening your back.
Benefits: Full-body workout, strengthens the posterior chain.
Variations: Conventional, sumo, and Romanian deadlifts.
4. Seated Cable Rows
Target Muscle: Lats, Rhomboids, Traps
How to Perform:
Sit with feet against the pad, grab the cable handle.
Pull the handle towards your torso while keeping your elbows close.
Benefits: Isolates the upper and middle back.
Variations: Wide-grip row, narrow-grip row.
5. Single Arm Dumbbell Rows
Target Muscle: Lats, Traps, Rhomboids
How to Perform:
Place one knee and one hand on a bench.
Hold a dumbbell in your other hand, pulling it towards your waist.
Benefits: Focuses on one side of the back, corrects muscle imbalances.
6. Face Pulls
Target Muscle: Rear Deltoids, Traps, Rhomboids
How to Perform:
Set a cable machine at eye level with a rope attachment.
Pull the rope towards your face, elbows flaring out.
Benefits: Excellent for shoulder health, builds upper back stability.
7. Hyperextensions
Target Muscle: Erector Spinae, Glutes
How to Perform:
Use a hyperextension bench, brace your feet, and fold over the pad.
Raise your torso to align with your legs, squeeze glutes.
Benefits: Strengthens the lower back, enhances core stability.
Section 3: Building an Effective Back Workout Routine
Structure and Frequency
For beginners: Start with two back workouts per week.
Intermediate/advanced: Three workouts per week, adjusting volume and intensity.
Sample Workout Routines
Beginner Routine
Pull-ups or Lat Pulldowns: 3 x 8–10
Seated Cable Rows: 3 x 10–12
Hyperextensions: 3 x 12–15
Intermediate Routine
Pull-Ups: 4 x 8–10
Barbell Rows: 4 x 8
Single Arm Dumbbell Rows: 3 x 10 (per arm)
Face Pulls: 3 x 15
Advanced Routine
Deadlifts: 4 x 5
Pull-Ups: 4 x 8
Barbell Rows: 4 x 8
Single Arm Dumbbell Rows: 4 x 10
Hyperextensions: 3 x 15
Section 4: Tips for Maximizing Your Back Workouts
Prioritize Compound Exercises
Compound exercises, like deadlifts and rows, build overall strength.
Focus on Mind-Muscle Connection
Visualize your muscles working and focus on each contraction, especially during rows and pull-ups.
Progressive Overload
Gradually increase weight or reps to avoid hitting plateaus.
Vary Your Grip and Angles
Use different grips to target all parts of the back.
Rest and Recovery
Avoid overtraining; aim for at least 48 hours between intense back workouts.
Common Mistakes to Avoid
Using Momentum: Avoid swinging the weights or using your back to lift. This negates the effectiveness of the exercise.
Elbow Positioning: Ensure your elbows remain fixed against the pad; lifting them can strain the shoulders and reduce isolation.
Not Full Range of Motion: Make sure to extend your arms fully at the bottom of each rep to fully engage the muscle.
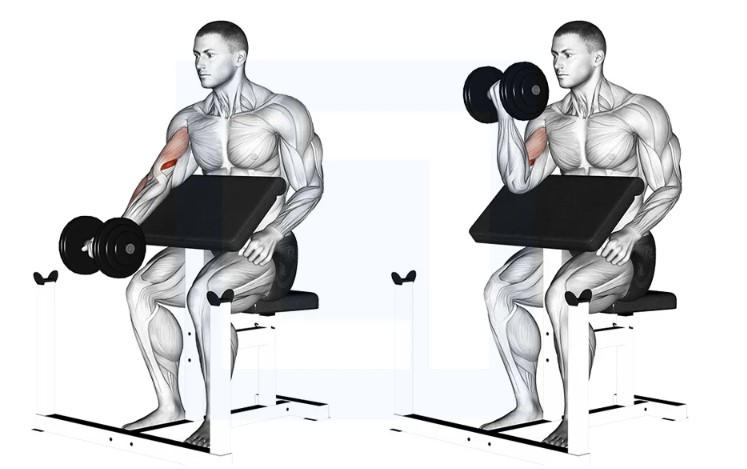
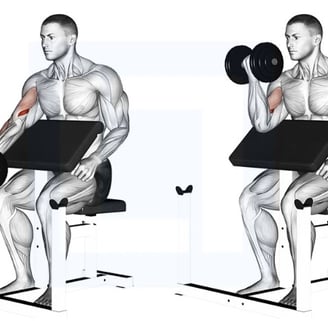
Variations of the Preacher Curl
To keep your workouts fresh and stimulate further muscle growth, consider incorporating variations of the preacher curl:
Dumbbell Preacher Curl: Allows for a greater range of motion and helps improve muscle symmetry.
Cable Preacher Curl: Using a cable machine can provide constant tension on the biceps throughout the movement.
Incline Dumbbell Curl: This variation targets the long head more effectively while still providing a good stretch to the short head.
Reverse Preacher Curl: This targets the brachialis and forearms, promoting overall arm strength.
Benefits of the Preacher Curl
Isolation: Perfect for strict bicep isolation, helping to develop peak size and definition.
Reduced Strain: The preacher bench position alleviates strain on the lower back compared to standing curls.
Improved Control: The fixed position of the elbows allows for better control over the movement, enhancing muscle engagement.
Versatility: Suitable for various fitness levels, from beginners to advanced lifters.
Integrating Preacher Curls into Your Routine
To maximize the benefits of preacher curls, consider the following tips:
Placement in Routine: Include preacher curls at the beginning or middle of your arm training session when your biceps are fresh.
Progressive Overload: Gradually increase the weight or number of reps each week to continue challenging your muscles.
Complementary Exercises: Pair preacher curls with compound movements like chin-ups and barbell curls for balanced arm development.
Conclusion
The preacher curl is a staple exercise that offers strict bicep isolation, making it a must-have in any strength training program. By following proper form, exploring variations, and understanding the anatomy of the bicep, you can maximize your gains and achieve the defined arms you desire.
Frequently Asked Questions (FAQ)
Q1: What muscles do preacher curls target?
A: Preacher curls primarily target the biceps brachii, particularly the short head, which helps give the biceps their peak. This exercise also engages the brachialis, a muscle underneath the biceps that contributes to arm thickness, and the brachioradialis, a forearm muscle.
Q2: Why is the preacher curl effective for bicep isolation?
A: The preacher curl eliminates momentum by locking your arms in a fixed position on the preacher bench. This ensures that the biceps are doing most of the work without assistance from other muscles or swinging, resulting in strict isolation and maximum muscle activation.
Q3: Should I use a barbell or dumbbells for preacher curls?
A: Both barbells and dumbbells have their advantages. A barbell preacher curl allows you to lift heavier weights, which can promote overall bicep growth. Dumbbells, on the other hand, allow for a greater range of motion and help correct muscle imbalances by working each arm individually. It's a good idea to incorporate both into your training for balanced development.
Q4: How many sets and reps should I do for preacher curls?
A: For muscle growth (hypertrophy), aim for 3-4 sets of 8-12 reps. If you're looking to build strength, go for 3-5 sets of 6-8 reps with heavier weights. For endurance and toning, consider 3-4 sets of 12-15 reps with lighter weights.
Q5: Can preacher curls cause elbow pain?
A: Preacher curls can sometimes cause discomfort if performed with poor form or too much weight. To avoid this, ensure you're using a controlled motion, keeping your wrists neutral, and not fully locking out your elbows at the top of the movement. If pain persists, try reducing the weight or switching to a different bicep exercise.
Q6: What’s the difference between preacher curls and concentration curls?
A: Both exercises are excellent for bicep isolation, but they have some key differences. Preacher curls use a bench to support your arms, allowing for heavier weights and focusing more on the short head of the biceps. Concentration curls, on the other hand, are performed seated with the arm unsupported, typically focusing more on the peak contraction and emphasizing the long head of the biceps.
Q7: How can I avoid common preacher curl mistakes?
A: The most common mistakes include using too much weight, swinging the arms, and not controlling the motion during both the upward and downward phases. Focus on using a weight that allows strict form, keeping your arms stable on the bench, and performing slow, controlled reps to maximize bicep engagement.
Q8: Can beginners perform preacher curls?
A: Yes, preacher curls are suitable for beginners as long as proper form is followed. Start with lighter weights to focus on technique and gradually increase the weight as you build strength. It's important to master the basics of bicep exercises before progressing to heavier loads.
Q9: Are preacher curls better than standing bicep curls?
A: Both exercises have their place in a well-rounded arm workout. Standing bicep curls allow for some momentum and heavier lifts, making them great for building overall strength. Preacher curls, however, offer stricter isolation, focusing more intensely on the biceps without assistance from other muscles. Combining both exercises in your routine can yield the best results.
Q10: How often should I include preacher curls in my workout?
A: For optimal results, aim to include preacher curls in your bicep training routine 1-2 times per week. Ensure you’re allowing sufficient recovery time (48-72 hours) between arm sessions to promote muscle repair and growth.
References
"Muscle hypertrophy is highly correlated with mechanical tension and metabolic stress, which are both achieved through exercises like the preacher curl." (Journal of Strength & Conditioning Research, 2021)
"Resistance training and its effect on muscle growth: A comprehensive review." (Sports Medicine, 2020)
Fitness
Expert tips for your fitness journey await you.
Nutrition
Wellness
+919316200784
© 2024. All rights reserved.
Write your text here...
2. Which is Better: Barbell or Dumbbell Bicep Curls?
Both barbell and dumbbell bicep curls are effective. Barbell curls allow for lifting heavier weights and provide balanced resistance, while dumbbell curls offer more flexibility and help correct muscle imbalances.